Labels

Showing posts with label breakfast. Show all posts

Friday

The Grand Ole Granola Bar

This is no hippie café, nay, although if I ever open one I lay claim to that name as of now. Rather, as the photos would suggest, I have been adventuring in the kitchen to finally try my hand at homemade muesli bars.
I wanted something simple & straightforward,  so I google-ized muesli bars & found this dandy recipe on several links.  I am now going to share with you my version, so get ready, 'cause it's crunch time!  
(. . . Pardon the awesome pun, I couldn't help myself.)


What ye shall need:

1 cup pitted dates, packed nice & cosy
1/4 cup syrupy sweetener (I opted for maple)
1/4 peanut butter (any nut butter would probably work wonders)
Couple pinches of salt
1 cup roughly chopped nuts of your choosing, raw or roasted
1 1/2 cup rolled oats
Any additional ingredients that you fancy: dried fruit, extra nuts, seeds, spices, etc.

First off, have your oven set at about 190 degrees C if you fancy toasting the oats and/or nuts.  You can leave them in there anywhere from 5 to 15 minutes.  I would keep an eye & a nose on alert so as to keep track of their progress.  Bitter almonds or burnt oats will lower the tone of the whole affair & who wants a muesli bar faux pas?  (Last one, promise ;)


On the stove, melt together your peanut butter, salt, & syrup in a small saucepan.  When they form a paste-like consistency, turn off the stove & allow to cool.


Pop the dates into a blender or food processor & whiz them up until they too transform to a paste-like texture.


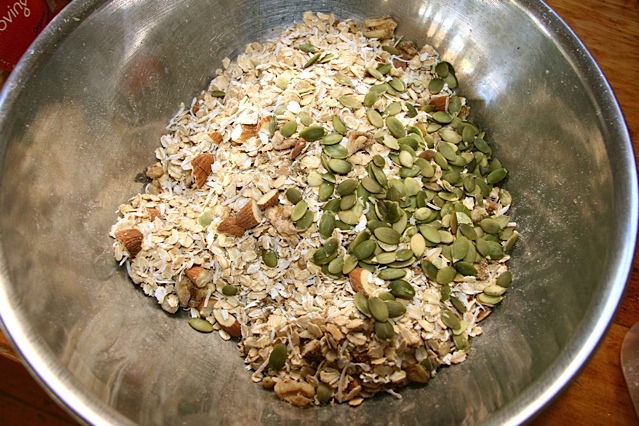
Toss all the dry ingredients in large bowl until you have yourself a confetti of bits & bobs . . .


When you have these components prepped, mix all the ingredients together in a bowl.  My additions consisted of goji berries, some orange chocolate shavings, raisins, & chopped dried figs.
Once well combined, have a baking tray at the ready, lined with parchment, into which you can pour or scoop your mixture.


With the mixture pressed into a flat slab within the baking tray's walls, you can pop it into the fridge or freezer for at least 15-20 minutes.
When you're ready, remove the slab to slice into the portion size of your preference.  Some like squares, some like rectangles, some may go for triangles or have the patience to carve out circles!  A favourite mantra of mine, "hip to be square" had me on team square.   


And that, folks, is my version of a more or less raw, vegan, muesli bar.  Hip to be square, amiright?!  


Monday

Yummola Granola

This morning I share with you a simple & delicious recipe that will last you for a good several days to a week.  (Unless you tend towards visiting your crunchy stash & munching on it throughout the day - ahem! Like some . . . then it might last not more that a couple days.)
Did I mention that it is also highly nutritious? Bonus.  It's got all of your good fats & protein & is ideal for a morning feed or something to keep you sustained throughout the day if any hunger pangs ever creep up.


The recipe comes from Sarah Wilson, pioneer of a sweet as sugar-free lifestyle.  This granola is a testament to that possiblity so naturally I cared to share.
Plus, there are tweaks you can make for this granola to add some bells & whistles.  I'll give you the three variations that I have made thus far . . .

The Original & the bomb:

3 cups coconut flakes
2 TBS chia seeds
1 teaspoon cinnamon 
2 cups roughly chopped nuts and/or seeds (my go-to's are almonds, walnuts & pepitas)
4-5 TBS coconut oil (melted)
1-3 TBS Rice Malt Syrup (or, alternatively some Stevia powder sprinkled over or Natvia granules added until you achieve your desired sweetness)

Oven pre-heating to 120 degrees C, mix all your dry ingredients together in a big bowl.  Once well combined, drizzle your coconut oil & (if using) rice malt syrup.  Mix through and spread evenly on a lined baking tray.  
Pop in the oven for 15-20 minutes (or until desired crunch factor is achieved).  Make sure to turn your granola at half time with a spoon so that it gets a nice well-rounded crisp.
Allow to cool once you're a happy chappy and then get even happier when you can launch in!  


Alternatively you can try out the Pumpkin Spice variety (it's a good 'un!) for which you follow the Original recipe, while adding:

1/3 cup pumpkin purée
1 tsp cinnamon powder
1 tsp ground allspice
1 tsp ground ginger
1/2 tsp ground cloves (optional)

If you decide to add some oats for more bulk, bring your coconut oil count to 6 TBS & the pumpkin purée to a 1/2 cup.  Then do your thang and proceed with the mixing.

Now, this next one is possibly my personal favourite.  It's got all the elements thanks to the fact that it tastes like chocolate!  Or perhaps more like a Bounty Bar.  So up next is the Cocoa Crunch:

You will need:

All the same ingredients as the Original but with half a cup raw cacao powder.
I also like to add in some sesame seeds & if you want to try yet another twist (on the twist) give it a go with peanuts or peanut butter.  Alternatively, hazelnuts can give it a nutella flavour.
Just beware of its addictiveness.
It is suitable for breakfast, snacks & dessert.  I love it with yogurt & sometimes a little chopped banana, apple, strawberries or goji berries sprinkled on top with some extra cinnamon to add some more spice to my life.
Let me know how you go if you make any of the above.  I'd be keen to hear :)  


Happy munching x

Saturday

Banana Bliss

Of all the fruits, if I was made to choose my favourite, it would be the banana.  Or maybe the apple. 
But basically I am trying to convey my love of the banana and its versatility.  Eat it by itself - yum.  Put it on muesli, yogurt, porridge, in smoothies, fry it as a side for eggs & bacon, my list goes on.
Recently, I found a recipe for a banana bread using almond meal in place of regular flour.  In place of sugar, it uses a natural sweetener, Stevia.  I am always intrigued to see how more healthful alternatives stand up to the old classic recipes in the deliciousness stakes.  
This one did pretty well.  Pretty well indeed.
                                     

I've adapted it a slightly.  Namely, I just added a little more stevia.  Instead of a loaf, this time I made muffins, adding berries & chocolate to the mix.

So for this batch of battery goodness, you will need:

2 cups almond meal/flour
1/2 tsp baking powder
1 tsp bicarb soda
1/2 tsp salt (I use Celtic or Himalayan Pink)
1 tsp ground cinnamon
1 pinch of nutmeg, grated
1/2 tsp vanilla extract
3 eggs
1/2 cup coconut oil or melted butter
1/4 cup milk of your choosing
3 mashed bananas
1/2 cup coarsely chopped walnuts
10-12 drops liquid stevia
1 cup mixed berries
Some chocolate shavings

Righty-oh.  Time to pre-heat.  Fix the oven at 170 degrees Celsius and off you go!
In a bowl mix almond flour, baking powder, bi-carb soda, salt, cinnamon & nutmeg.
Grab a large bowl and whisk eggs, coconut oil/butter, milk, stevia & vanilla together.
Then, all-in-together-this-fine-weather for dry & wet ingredients.


When nicely combined, gently fold in the mashed banana and your chopped walnuts.
Quality control the batter for sweetness and add one or two more drop of stevia if your sweet tooth is not yet satisfied.


Have some patty pans ready to go in a muffin tray and spoon in batter until each is roughly 3/4 full.
Then adorn each however you like.


Pop them in the oven for about 20-25 minutes.  I would check them at 20 as being more petite they require less cooking time.
When good and golden, take out your tray and allow muffins to cool on a wire rack.  They will likely continue to firm up as they're cooling.


If going the way of the loaf, cook for 30-40 minutes.  
As I like my banana bread a little under done and gooey in the middle so I opt for less cooking time.


Whatever form it takes, this recipe is pure bliss!
Enjoy with a cuppa or a good ol' glass of milk.

Wednesday

Early morning crunchies / late night munchies

And a good morning to you!


It may be morning now but am I know I'm not the only person in the world who could devour a bowl or cereal at any point in the day, relishing especially as an after dinner treat or movie snack to munch on while cozied up on the couch.
Yesterday, I was experimenting with some inspiration from the great Joy the Baker.  Upon spying some lonely looking oats in a half opened package along with the knowledge that even dried fruit has an expiry I thought it high time I get going with some granola.
Granola, despite being everywhere, available from Supermarkets to Health Food stores, is still so satisfying to make yourself.  And when you get a good one, a good blend and ratio or cereal to fruit to nuts - one that is not too sweet, nor bland - it is also super satisfying to eat.  I also like the idea that by making it yourself, you can use up any dwindling ingredients you have hanging out in the cupboard or fridge but who've been loitering there for a while.  Thus giving all involved a sense of purpose.
So, aside from love, here is what I went into the creation of my Maple Nut Crunch:

3 cups rolled oats
1/2 cup shredded coconut
1/4 cup ground flax seed
1/4 cup pepitas / pumpkin kernels
1/3 cup chopped walnuts
1/2 cup chopped almonds
a pinch of cinnamon
3 tablespoons extra virgin olive oil / oil of your choosing
3 tablespoons organic apple juice concentrate
4-5 tablespoons pure maple syrup
1/4 teaspoon pure vanilla essence

This will provide about 5 cups worth of granola.

Start by pre-heating the oven to 325 degrees F or 160 degrees C.
Line a baking dish with some heat proof paper


Then, toss together your dry ingredients . . .


Then drizzle over them the oil, apple juice syrup, maple syrup and the vanilla.


Spread the sticky mixture over your baking tray, making it as even as possible.
Pop it in the oven for about 15-20 minutes, inspecting it to see whether you want it more or less crispy golden.


Give it a toss around the tray with a fork or spoon to expose the under layers that have yet to attain their crunch factor. Then pop it in the another 15-20 minutes.


Once it's coloured to your liking, allow it to cool on the tray a little while before adding your mélange of dried fruits.  I had some stray currents, Turkish apricots, Iranian figs and goji berries to add to mine.  Mmm, warm and autumnal colours (despite it being Spring, ahem!).


Happy crunching to all!